Before you can create a project you need to create a customer record first. Once created you assign projects to the customer, keeping all projects against the customer record makes it easy to keep track of your best and repeat customers. It also makes it easier to find old project records
 Creating Customer Records
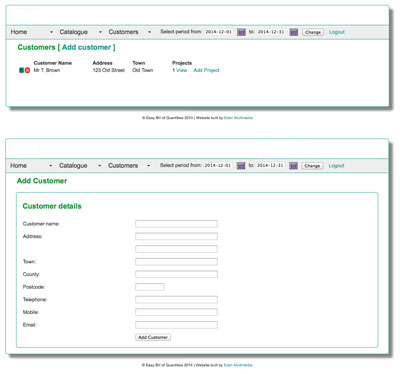
From the customers menu you can both edit or delete the customer record, view existing projects or add new ones.
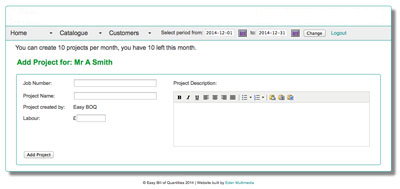
If the customer doesn't already exist click 'Add Customer' to create a new customer record.
The customer information is used to populate the address fields on quotes and invoices.
The only required field is the customer name, ItemisedInvoicing.UK is not a Customer Management System (an option will be available Summer 2015 to provide this function). However, it makes sense to include address and contact information just in case you have more than one client with the same name etc. If using the invoice by email function you need to include your customer email address.
 Creating A New Project
To create a new project click 'Add Project' against the appropriate client record.
Enter the details as required, you can style the project description using the formatting tools to make document easier to read when printed later.
Don't worry if you don't get it right first time everything can be edited later.
Important
If copy & pasting from Microsoft Word click the icon with the Word logo first and paste the description into the popup window. This will remove the unnecessary code that clutters Word documents!
Note: When you create a new project a summary of your usage in the current month is displayed at the top.
 Add Items to Project
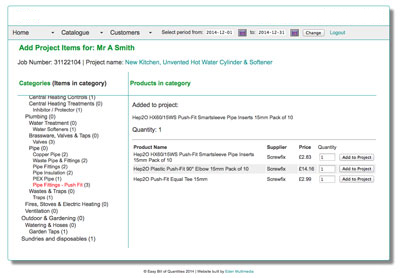
Clicking 'Add Project' creates the project, the subsequent screen prompts you to add project items.
Scroll down the categories in the left hand pane and click on the category where the items you require are listed. The numbers in brackets indicate how many items are active in each category. The active category is displayed in red.
Once selected, the items in the chosen category are displayed in the right hand pane. Enter the quantity required and click 'Add to project' - confirmation of the item added is displayed above.
Note: If you attempt to add an item that has previously been added you will get a message asking you to amend the quantity on the project edit page.
Repeat the process to add all the items needed for the project.
Once all items have been added click on the project name to go to the project edit/review page.
 Project Edit and Review
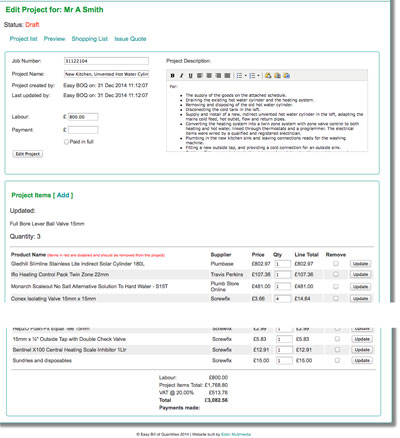
The project now has the status of draft.
Check the project details and amend as required. Items are amended on a line by line basis, to remove an item select the remove option and click update. If you need to add more items click 'Project Items [ Add ]' and repeat as in previous step.
At the bottom of the project page is a price summary including VAT (if tax option chosen) and listing any payments made.
At the top of the project details is a menu with a number of options depending on the status of the project. The options are as follows:
- Project list
- Return to list of customer projects. - Preview
- Preview the project to check formatting ready for printing. On the preview page click Print, depending on your printer you may need to adjust some of the printer settings to remove unnecessary clutter. The project details and bill of quantities are automatically split between two pages. - Shopping list
- Creates a shopping list of items grouped by supplier with product names & quantities (and if included SKU numbers). The line price provides an easy reference in case there is a price difference between the one entered against your Easy Bill of Quantities item and that held at the supplier (making it easy to quickly edit to the prices later). - Issue Quote
- If all details are correct click the issue quote link, this provides the option to add internal notes to refer back to. Issuing the quote is an important step to creating project history (see next options). - Issue Interim
- Projects invariably change either prior to commencement or during. The Issue Interim provides the option to record unlimited versions of the project record. If you make any changes to the project an error message will appear at the bottom of the project page prompting you to Issue an Interim. The notes are for internal use only when viewing the project history. - Final Invoice
- This finalises the project, only payments and paid in full selected are permitted. - History - Allows you to review all stages of the project.
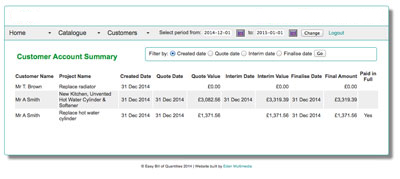 Customer Account Summary
This provides a quick overview of all of your projects and their status.
Date range defaults to the current month, to change the range select the dates on the menu.
Filter options are self-explanatory, the default is by project created date.